It's been about 3 weeks since we have been living Paleo the way a lot of people do it: 80/20. If you read my posts a few weeks back, you read about our plans to continue living Paleo- not 100% of the time, but to allow some "cheat" days. Well, we have worked out a lifestyle plan that has been working really well for us(in my opinion). It is more like 75/25 (where we are Paleo 75% of the time and non-Paleo 25% of the time), but still has the same idea as 80/20.
For us, it looks like this: We stay Paleo 5 days of the week, and have 2 "cheat," or non-Paleo days a week. We decided that we would pick 2 days of the week that we would be free to eat whatever we wanted, and for us that has ended up being the weekend- Friday and Saturday. This way, we get to go out to dinner/drinks or order-in on the weekend nights that we want to relax and hang out together. Plus, it is nice to have 2 days a week where I can indulge in lots of cheese, pasta, bread, etc. You know I can't live without that stuff forever!
So, how is it going for our health? I still feel really good and healthy. I will say that we have been binge-eating a bit on our off-days, so I feel a little gross and bloated when that happens, of course. We've both pretty much maintained our weight and are still feeling energized and happy. It is nice to eat all-natural and clean most of the time, and I like that I have a reason to continue to create new and different Paleo meals!
If you want to try out Paleo but aren't sure about diving right in 100%, I would definitely recommend you at least start with 75/20 (or even go with just 1 cheat day a week if you want). It is surely better than nothing, and you will be changing a lot of your habits about eating. We hope to stick with this way of life for a long time, and it really hasn't been hard. Now that we have our off-days, we aren't really missing any foods but are still staying healthy. I'll keep you posted on our successes and of course, stay tuned for the latest meal creations!
Saturday, April 27, 2013
Thursday, April 25, 2013
Paleo Coconut Chicken Crispers
This meal tonight happened because of 2 factors: 1) I realized I have almost no food/fresh produce in the house somehow, and 2) After weeks of looking for unsweetened coconut flakes in every grocery store (unsuccessfully), I FINALLY found them at Natural Grocers the other day and bought a bag, so of course I wanted to use that. So, what else was there to make but coconut-breaded chicken?? This is a lot like other "breaded" items I have made, but had a bit of a different texture/taste and was really delicious. It was also super easy! Here is what I did:
 Paleo Coconut Chicken Crispers
(serves 2-4)
Preheat oven to 400 degrees. Slice chicken breasts into thin slices. You can pound the chicken to make it thinner, or I sliced the breasts in half to make them thinner. Then I cut them into chicken finger-like pieces. In a bowl/dish, combine coconut flour with onion powder and garlic powder. In a different bowl, whisk the egg. In a dish/plate, combine the coconut with salt and pepper. I set up a bit of an assembly line to bread them. First, dip the chicken in the flour mixture, then into the egg, and finally into the coconut flakes until they are nice and coated. Place the strips on a baking sheet (lined with parchment for easy cleanup), making sure they are not touching. Put the sheet in the oven and bake for 10-20 minutes, depending on thickness of the strips. I also turned mine over about halfway through to brown both sides. They should be done when they look like this:
 I served these with Sweet Potato Fries and Paleo Ketchup for dipping, but you could use Paleo Barbecue Sauce as well. If you like the texture of coconut, these are perfect, and it was a nice creative meal- something I never tried before! For not having much in the house, this was a great dinner!

Paleo Coconut Chicken Crispers (serves 2-4)
- 2 chicken breasts
- 1/4 c coconut flour
- 1/2 t onion powder
- 1/2 t garlic powder
- 1 egg
- 1 c (or more) unsweetened coconut flakes
- 1/2 t salt
- 1/4 t black pepper
Preheat oven to 400 degrees. Slice chicken breasts into thin slices. You can pound the chicken to make it thinner, or I sliced the breasts in half to make them thinner. Then I cut them into chicken finger-like pieces. In a bowl/dish, combine coconut flour with onion powder and garlic powder. In a different bowl, whisk the egg. In a dish/plate, combine the coconut with salt and pepper. I set up a bit of an assembly line to bread them. First, dip the chicken in the flour mixture, then into the egg, and finally into the coconut flakes until they are nice and coated. Place the strips on a baking sheet (lined with parchment for easy cleanup), making sure they are not touching. Put the sheet in the oven and bake for 10-20 minutes, depending on thickness of the strips. I also turned mine over about halfway through to brown both sides. They should be done when they look like this:
Tuesday, April 23, 2013
Paleo Asian Dumplings & Sesame Noodles
So I have been craving dumplings like crazy lately. Okay, not just lately, I love dumplings all the time. When I was in college, there was a local dumpling shop called Marco & Lucas and they have literally the greatest dumplings EVER. Seriously, ask anyone who has lived in Charlottesville, VA and they will rave about this place. Honestly, this dumpling shop is probably one of the top things my husband and I miss about Virginia. Can you tell by now how much I love these things? You can get them with these sesame noodles and the combination is just amazing. PHEW. Amazing! So, I have never tried to replicate them (and I have never made any kind of dumplings before), so this was quite an experiment to make PALEO dumplings that needed to be amazing. I found the dumpling recipe here and tried to do it my way, and then I kind of came up with the noodle side dish on my own. I won't lie- this meal is time consuming. It involves a lot of time and effort and dirty dishes. BUT, if you are prepared to put some love into it, the results are well worth it! Here is what I did (warning: this is going to be long):
Paleo Asian Dumplings
(serves 3-4)
FILLING:
(NOTE- this is likely a lot more batter than you need, but the first time you may need extra in case of mistakes. If you are skilled at wrapper-making, you can probably halve this)
To make the filling, heat the olive oil in a large skillet over medium high heat. Add the garlic, onion and carrots and saute for about 3 minutes until soft. Add the pork and cook for another 5 minutes or until cooked through, breaking up the pork into small pieces as it cooks. Once all the pink is gone, add the green onions, bok choy, tamari sauce, sesame oil, and red pepper to the pan and stir to combine all ingredients. Add salt & pepper to taste, and adjust the seasoning to your liking. Transfer the mixture into a bowl and refrigerate it for at least 1 hour, but I kept it in there overnight. Once the mixture has fully cooled (the next day, for me), mix in the whisked egg with your hands, making sure it is fully combined with the pork mixture. Set the mixture aside until your wrappers are ready.
Next, I prepped the wrapper batter. Divide the eggs and place the whites into a bowl, and set the yolks aside. Whisk the whites until they are very frothy. Add the yolks in and carefully combine them all together. In a separate bowl, combine the water and arrowroot powder. Slowly combine the water mixture with the eggs while stirring. Once nice and combined, set the bowl aside for at least 20 minutes to thicken up a bit. It will be very runny!
While waiting for the batter to set, I made the dipping sauce. Just combine the tamari sauce, vinegar, and chili flakes and set aside until you are ready to eat!
To make the dumpling wrappers, heat a skillet over medium heat on the stove. HINT: the skillet will get hotter as you go along, so you may need to turn back the heat periodically if it gets too hot. If your skillet is nonstick, you are fine, otherwise grease it with some coconut oil. Pour about 1-2 tablespoons of batter onto the center of the skillet and use your spoon/pourer to spread it into a circle, about 4-5 inches in diameter is best. Cook it VERY fast- about 15 seconds, then flip it with a spatula and cook for just about 5 seconds on the other side. You want them to be a bit moist and uncooked so the will be sticky and seal together. While cooking, it should look like this:

Remove to a baking mat or plate and make sure the less-cooked side is up (the last side that was on the bottom). Spoon about 1 tablespoon of the filling into the middle like so:

Fold the dumplings up (I just did mine in half), and use a fork to seal the edges together. Mine ended up looking like this (NOT the prettiest, but not bad for my first try!)

Repeat until you run out of filling. P.S., I had about 18 total dumplings and did NOT use all the batter. Once you have all your dumplings formed, you are ready to cook them! Heat a skillet over medium on the stove and lightly coat the bottom with coconut oil. Place about 5-10 dumplings on the pan, being sure not to let them touch each other. Do not touch them for about 3 minutes so they can brown up on the bottom. Then, flip them over and pour a splash of broth or water into the pan. Cover the pan and steam them for about 1 minute. Remove from the pan and repeat with the rest of the dumplings. I did 3 or 4 batches total and just covered them with foil as I did the rest.
 NOTE: These turned out a little soggy compared to what I am used to, since, they aren't really traditionally fried. Instead of doing the steaming, I might consider putting them into the oven after frying them to get them more crispy. So, try that if you want! But, I read that because these are gluten-free, they won't ever be as crispy as dumplings with gluten... oh well!
Once they are all cooked, serve these babies with your delicious dipping sauce and you will be so happy with the taste! And if you want a more authentic Marco & Lucas experience, serve them with the sesame noodles...
Paleo Sesame Noodles
(serves 3-4)
 Preparation
In a small bowl, combine almond butter, tamari sauce, sesame oil, and red chili flakes. Mix well. Toss the spaghetti squash "noodles" and cucumber together, and toss it all with the sauce. Sprinkle the sesame seeds on top and mix it up. Serve topped with more sesame seeds.
NOTE: You could also use zucchini noodles or kelp noodles to get the same type of dish
Well, after a LONG arduous process, we finally got our dumplings- Paleo-style! This meal was really delicious. Of course it is not as amazing as the original or any traditional dumplings, but I think it came close! Definitely satisfied my dumpling craving, and it was fun to learn how to make these bad boys! If you have the time and energy, I urge you to try this one out. Enjoy!

Paleo Asian Dumplings
(serves 3-4)
FILLING:
- 1 T olive oil
- 1/2 onion, finely diced
- 2 cloves garlic, minced
- 1 carrot, finely diced
- 1/2 lb ground pork
- 3 green onions, chopped
- 1-2 c bok choy, finely diced
- 3 T tamari sauce
- 2 t sesame oil
- dash crushed red pepper
- salt & pepper
- 1 egg, whisked (used to combine the mixture once it has cooled)

(NOTE- this is likely a lot more batter than you need, but the first time you may need extra in case of mistakes. If you are skilled at wrapper-making, you can probably halve this)
- 6 eggs
- 2 c arrowroot powder
- 1 c water
- coconut oil
- about 1/2 c chicken broth or water
- 2 T tamari sauce
- 1 t apple cider vinegar
- dash of red chili flakes
To make the filling, heat the olive oil in a large skillet over medium high heat. Add the garlic, onion and carrots and saute for about 3 minutes until soft. Add the pork and cook for another 5 minutes or until cooked through, breaking up the pork into small pieces as it cooks. Once all the pink is gone, add the green onions, bok choy, tamari sauce, sesame oil, and red pepper to the pan and stir to combine all ingredients. Add salt & pepper to taste, and adjust the seasoning to your liking. Transfer the mixture into a bowl and refrigerate it for at least 1 hour, but I kept it in there overnight. Once the mixture has fully cooled (the next day, for me), mix in the whisked egg with your hands, making sure it is fully combined with the pork mixture. Set the mixture aside until your wrappers are ready.
Next, I prepped the wrapper batter. Divide the eggs and place the whites into a bowl, and set the yolks aside. Whisk the whites until they are very frothy. Add the yolks in and carefully combine them all together. In a separate bowl, combine the water and arrowroot powder. Slowly combine the water mixture with the eggs while stirring. Once nice and combined, set the bowl aside for at least 20 minutes to thicken up a bit. It will be very runny!
While waiting for the batter to set, I made the dipping sauce. Just combine the tamari sauce, vinegar, and chili flakes and set aside until you are ready to eat!
To make the dumpling wrappers, heat a skillet over medium heat on the stove. HINT: the skillet will get hotter as you go along, so you may need to turn back the heat periodically if it gets too hot. If your skillet is nonstick, you are fine, otherwise grease it with some coconut oil. Pour about 1-2 tablespoons of batter onto the center of the skillet and use your spoon/pourer to spread it into a circle, about 4-5 inches in diameter is best. Cook it VERY fast- about 15 seconds, then flip it with a spatula and cook for just about 5 seconds on the other side. You want them to be a bit moist and uncooked so the will be sticky and seal together. While cooking, it should look like this:
Remove to a baking mat or plate and make sure the less-cooked side is up (the last side that was on the bottom). Spoon about 1 tablespoon of the filling into the middle like so:
Fold the dumplings up (I just did mine in half), and use a fork to seal the edges together. Mine ended up looking like this (NOT the prettiest, but not bad for my first try!)
Repeat until you run out of filling. P.S., I had about 18 total dumplings and did NOT use all the batter. Once you have all your dumplings formed, you are ready to cook them! Heat a skillet over medium on the stove and lightly coat the bottom with coconut oil. Place about 5-10 dumplings on the pan, being sure not to let them touch each other. Do not touch them for about 3 minutes so they can brown up on the bottom. Then, flip them over and pour a splash of broth or water into the pan. Cover the pan and steam them for about 1 minute. Remove from the pan and repeat with the rest of the dumplings. I did 3 or 4 batches total and just covered them with foil as I did the rest.
NOTE: These turned out a little soggy compared to what I am used to, since, they aren't really traditionally fried. Instead of doing the steaming, I might consider putting them into the oven after frying them to get them more crispy. So, try that if you want! But, I read that because these are gluten-free, they won't ever be as crispy as dumplings with gluten... oh well!Once they are all cooked, serve these babies with your delicious dipping sauce and you will be so happy with the taste! And if you want a more authentic Marco & Lucas experience, serve them with the sesame noodles...
Paleo Sesame Noodles
(serves 3-4)
- 1 T almond butter
- 2 T tamari sauce
- 1 T sesame oil
- dash red chili flakes
- 1/2 cucumber, thinly julienned
- 1 T sesame seeds
- 1/2 spaghetti squash, cooked, shredded, and cooled
PreparationIn a small bowl, combine almond butter, tamari sauce, sesame oil, and red chili flakes. Mix well. Toss the spaghetti squash "noodles" and cucumber together, and toss it all with the sauce. Sprinkle the sesame seeds on top and mix it up. Serve topped with more sesame seeds.
NOTE: You could also use zucchini noodles or kelp noodles to get the same type of dish
Sunday, April 21, 2013
Paleo Brat Kebabs
A miracle happened today- the temperature outside actually got into the 50's! Being that it is almost May, this shouldn't be THAT big of a deal, but considering it is going to snow AGAIN tomorrow, this was pretty amazing. The point is, I decided to grill out tonight since the weather was nice. I guess this isn't the most inventive recipe in the world, but I did find it via Pinterest and the recipe seemed pretty basic and easy to make Paleo. This meal was very similar to the Chicken Kebabs that I made a while back, and like most kebabs, you can really use whatever veggies you want- I used what I had on hand, but if I had things like mushrooms and other bell peppers, I would have used those too. But here is what I did:
Paleo Brat Kebabs
 (serves about 4)
First, prep the brats. Grab a large stock pot and place the brats, celery, carrot, and onion in it. Fill it with water high enough to cover it all. Heat the pot over medium-high or high until it starts to boil, then turn down the heat to medium-low and allow it to simmer for about 20-30 minutes. Try not to let it boil too much. (P.S. If you are non-Paleo and want to make these even better, we usually use beer instead of water and the brats turn out amazing!). Once they are cooked, pull them out of the pot and allow them to cool to the touch. Cut up the brats into chunks- I got 5 chunks from each brat.
At this point, turn on the grill to medium-high heat. Grab some skewers to make the kebabs. Alternate the brats, zucchini, pepper, and red onion onto the skewers. Right before they go on the grill, baste them with the barbecue sauce all over. As you grill, you may want to baste them each time you turn them as well. Grill for about 7-10 minutes. The meat will already be cooked, so just make sure the veggies char up a bit. Take them off the grill and serve them up!

I served these alongside the Cauliflower Rice Pilaf I have made before, and it was a delicious meal! I think kebabs are super easy to make, and are so versatile as you can really use whatever meat/veggies/sauce you have on hand. I hope you try this out and enjoy!
Paleo Brat Kebabs
(serves about 4)- 6 brats/sausages
- 1 celery stalk, chopped into large chunks
- 1 carrot, chopped into large chunks
- 1/4 onion, chopped into large chunks
- about 4 cups water
- 1 large (or 2 small) zucchini, chopped into chunks
- 1 bell pepper (I used yellow), chopped into chunks
- 1/4 red onion, chopped into chunks
- 1/2 - 1 c Paleo barbecue sauce
First, prep the brats. Grab a large stock pot and place the brats, celery, carrot, and onion in it. Fill it with water high enough to cover it all. Heat the pot over medium-high or high until it starts to boil, then turn down the heat to medium-low and allow it to simmer for about 20-30 minutes. Try not to let it boil too much. (P.S. If you are non-Paleo and want to make these even better, we usually use beer instead of water and the brats turn out amazing!). Once they are cooked, pull them out of the pot and allow them to cool to the touch. Cut up the brats into chunks- I got 5 chunks from each brat.
At this point, turn on the grill to medium-high heat. Grab some skewers to make the kebabs. Alternate the brats, zucchini, pepper, and red onion onto the skewers. Right before they go on the grill, baste them with the barbecue sauce all over. As you grill, you may want to baste them each time you turn them as well. Grill for about 7-10 minutes. The meat will already be cooked, so just make sure the veggies char up a bit. Take them off the grill and serve them up!
I served these alongside the Cauliflower Rice Pilaf I have made before, and it was a delicious meal! I think kebabs are super easy to make, and are so versatile as you can really use whatever meat/veggies/sauce you have on hand. I hope you try this out and enjoy!
Friday, April 19, 2013
Balsamic Steak & Veggie Rolls
Recently I found a recipe on Pinterest (of course) that looked so good that I knew I wanted to try it. However, like most recipes, I would have to make a few Paleo substitutes, particularly because the recipe included things like butter and Worcestershire sauce, which are a no-go for Paleo-ites. So, I made a few adjustments and came up with this delicious meal! It was really yummy, and even though it was a bit time-consuming, it was worth it. The only problem I had was that mine did not coming out looking as perfect as the original picture... Do things ever look as good as they do on Pinterest though? Oh well, regardless, I would recommend you try this out! Here is what I did:
Balsamic Steak & Veggie Rolls
(serves 2-3)
I started by prepping the veggies. You want to slice them into matchstick pieces, so you can use a knife, a mandolin, or a peeler/julienner like I did. Slice the carrot and zucchini this way, and slice the bell pepper and onion into thin slices as well. FYI I did this a few hours in advance and just let them sit in a bowl in the fridge. Here is what my veggies looked like:

To prep the steak, slice it into 2-3 inch strips. I also cut mine in half to make the meat slab thinner, which you might want to do if yours is a bit thick. My strips were only about 1/4-1/2 inch thick, which I think is best. Then, season them with salt and pepper and set them aside. Here are my strips (I got 6 out of my steak):

Next, make the sauce. Heat a large skillet over medium-high and add about 2 T olive oil. When it is hot, add the shallots/onion to the pan and saute until translucent. Then, add the balsamic vinegar, honey, and broth and stir until smooth. Allow it to bubble up and thicken for about 5 minutes, stirring occasionally, then pour off all the sauce into a bowl. Set aside.
Reheat the pan to high heat and add another 1 T olive oil and the clove of garlic. Stir the garlic around for a minute or so to flavor the oil, then you can fish it out. Dump in your veggies and stir fry them around for just about 2-3 minutes until just cooked. Add the Italian seasoning and salt and stir a bit more. Once it was all cooked, I removed the veggies back to the bowl they had been in so I could start to prep the rolls.
To assemble the rolls, pile a stack of the veggies onto the middle of one of the steak strips, roll it up, and fasten with a toothpick. Repeat with the other rolls. Mine were not beautiful but they looked like this:

Reheat the skillet over medium-high heat and add a little bit of oil to the pan. Once it is hot, place the rolls seam side down into the pan. Do not touch them for a few minutes so they can brown up, then turn the rolls to cook them on all sides. Mine were medium/medium-rare in just about 5-7 minutes total.
FINALLY, take the steak rolls out of the skillet, remove the toothpicks, and serve with the balsamic sauce spooned over the top of each roll. Check them out!

So, the instructions look pretty complicated, but I would say the most time was spent just prepping the veggies. I think I could have done a better job on making the rolls look pretty, but they still tasted great! I served these with some sauteed tomatoes for extra veggies, and it was definitely a VERY Paleo meal- all meat and veggies! Try it for yourself and see how great this meal is!

Balsamic Steak & Veggie Rolls
(serves 2-3)
- 1 carrot
- 1/2 zucchini
- 1 red bell pepper
- 1/4 onion
- 1 clove garlic, smashed
- olive oil
- 1 tsp Italian seasoning
- 3/4 - 1 lb flank steak
- salt & pepper
- 1-2 T shallots (or sweet onion), finely diced
- 1/4 c balsamic vinegar
- 2 T raw honey
- 1/4 c chicken or beef broth

I started by prepping the veggies. You want to slice them into matchstick pieces, so you can use a knife, a mandolin, or a peeler/julienner like I did. Slice the carrot and zucchini this way, and slice the bell pepper and onion into thin slices as well. FYI I did this a few hours in advance and just let them sit in a bowl in the fridge. Here is what my veggies looked like:
Next, make the sauce. Heat a large skillet over medium-high and add about 2 T olive oil. When it is hot, add the shallots/onion to the pan and saute until translucent. Then, add the balsamic vinegar, honey, and broth and stir until smooth. Allow it to bubble up and thicken for about 5 minutes, stirring occasionally, then pour off all the sauce into a bowl. Set aside.
Reheat the pan to high heat and add another 1 T olive oil and the clove of garlic. Stir the garlic around for a minute or so to flavor the oil, then you can fish it out. Dump in your veggies and stir fry them around for just about 2-3 minutes until just cooked. Add the Italian seasoning and salt and stir a bit more. Once it was all cooked, I removed the veggies back to the bowl they had been in so I could start to prep the rolls.
To assemble the rolls, pile a stack of the veggies onto the middle of one of the steak strips, roll it up, and fasten with a toothpick. Repeat with the other rolls. Mine were not beautiful but they looked like this:
Reheat the skillet over medium-high heat and add a little bit of oil to the pan. Once it is hot, place the rolls seam side down into the pan. Do not touch them for a few minutes so they can brown up, then turn the rolls to cook them on all sides. Mine were medium/medium-rare in just about 5-7 minutes total.
FINALLY, take the steak rolls out of the skillet, remove the toothpicks, and serve with the balsamic sauce spooned over the top of each roll. Check them out!
So, the instructions look pretty complicated, but I would say the most time was spent just prepping the veggies. I think I could have done a better job on making the rolls look pretty, but they still tasted great! I served these with some sauteed tomatoes for extra veggies, and it was definitely a VERY Paleo meal- all meat and veggies! Try it for yourself and see how great this meal is!
Thursday, April 18, 2013
Paleo Chocolate Cake (in Under 5 Minutes!)
So last night I was home alone (with the dog of course) and the snow was STILL coming down. Getting tired of reading about the snow? Yeah, I'm getting tired of living it. Well I wanted some kind of dessert but didn't want to bake a whole batch of cookies or anything like that (not without my husband home to enjoy them!), so I decided to try out this recipe for a single serving of Paleo cake! Sounded just right for what I needed at that moment. This literally took less than 3 minutes, tasted delicious, and the best part (in my opinion) was that the only cleanup was a mug, a spoon, and a tablespoon. That's it! I would definitely recommend you try this out if you want a quick delicious dessert just for you. Here is what I did:
 Paleo Chocolate Cake (in Under 5 Minutes!)
(serves 1 OR 2)
Mix all ingredients together in a mug. Microwave on high for 2 minutes. Eat it up!!!

This should take no time at all and will be worth it for sure! You could probably split this between 2 people (share the mug with your hubby or just scoop some out), but I ate it all myself :) It's Paleo, so it's healthy... right??? Hope you try this out and enjoy it too!
Paleo Chocolate Cake (in Under 5 Minutes!)(serves 1 OR 2)
- 3 T almond flour
- 3 T cocoa powder
- 2 T raw honey
- 1 t vanilla
- 1 egg
- a dash of salt
- a dash of cinnamon
Mix all ingredients together in a mug. Microwave on high for 2 minutes. Eat it up!!!
This should take no time at all and will be worth it for sure! You could probably split this between 2 people (share the mug with your hubby or just scoop some out), but I ate it all myself :) It's Paleo, so it's healthy... right??? Hope you try this out and enjoy it too!
Paleo Zucchini Bread
Okay, so yesterday I made the most amazing zucchini bread ever. Seriously good. I have been thinking about making this for a while now, and I found a recipe that looked really good. Well, we have had snow days for the past 2 days (which if you know anything about where I live, you'll know that is HUGE) but my husband has been out at work, so I have been home alone (with the dog) for a while now. What else to do but bake??? Perfect time to try it out. This recipe is SO delicious and moist and flavorful and did I mention PALEO? It's really healthy, so that means it's okay that I ate the entire loaf by myself in the last 2 days, right...? Right. Well, here is what I did:
 Paleo Zucchini Bread
(makes 1 loaf)
Preheat oven to 350 degrees and grease a loaf pan with coconut oil. Combine flour, baking soda, salt, and cinnamon in a small bowl and set aside. In a large bowl (or your KitchenAid!), combine eggs, honey, banana, and coconut oil and mix until well combined. Add the zucchini (make sure you got most of the moisture out!) and mix well. Add the dry ingredients to the wet mixture and mix until well incorporated. Pour the batter into the loaf pan. Bake for 30-35 minutes or until a toothpick comes out clean when inserted into the middle. Remove from the oven and allow to cool in the pan for about 5 minutes. Transfer the bread to cool on a wire rack.
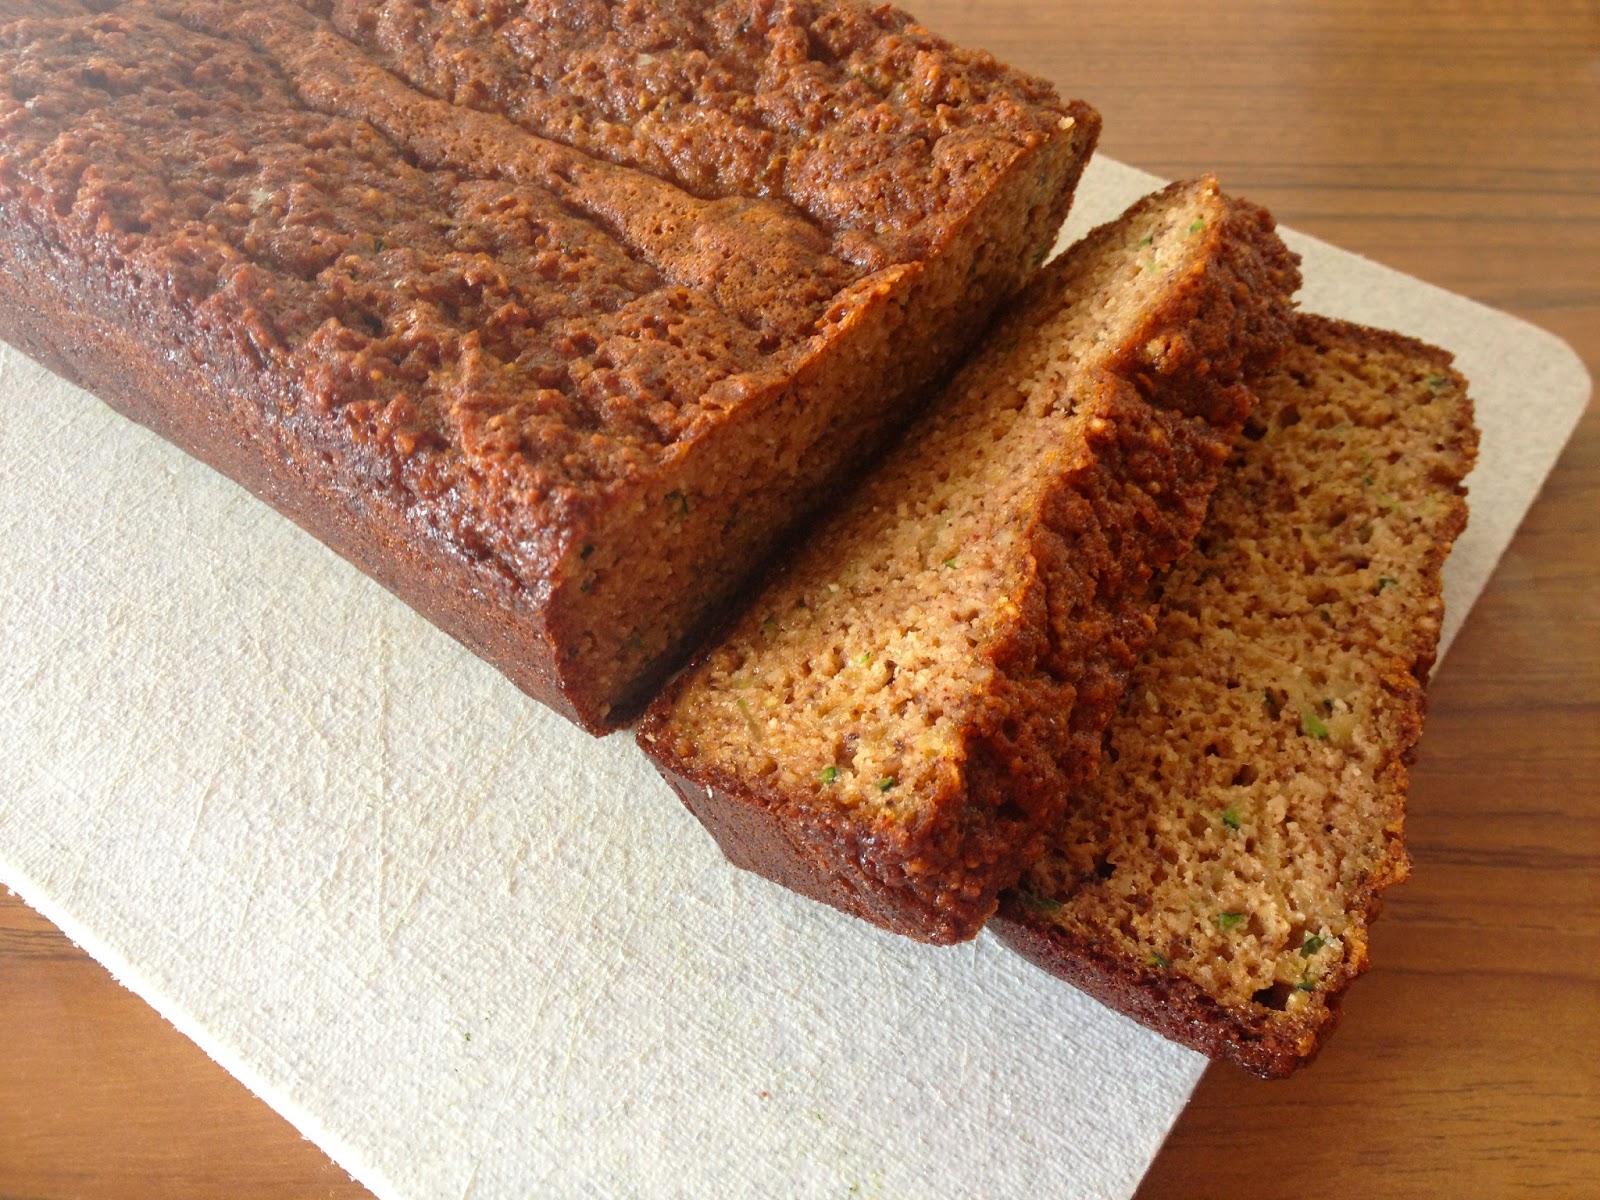

This will taste fine when warm, but I think it is best when it is cool. Slice it up and enjoy! And try not to eat the entire loaf by yourself in one day...
Paleo Zucchini Bread(makes 1 loaf)
- 1 1/2 c almond flour
- 1 1/2 t baking soda
- 1/2 t sea salt
- 1 t cinnamon
- 3 eggs
- 3 T raw honey
- 1 banana, peeled and mashed
- 1 T coconut oil, melted
- 1 cup grated zucchini (moisture squeezed out)
Preheat oven to 350 degrees and grease a loaf pan with coconut oil. Combine flour, baking soda, salt, and cinnamon in a small bowl and set aside. In a large bowl (or your KitchenAid!), combine eggs, honey, banana, and coconut oil and mix until well combined. Add the zucchini (make sure you got most of the moisture out!) and mix well. Add the dry ingredients to the wet mixture and mix until well incorporated. Pour the batter into the loaf pan. Bake for 30-35 minutes or until a toothpick comes out clean when inserted into the middle. Remove from the oven and allow to cool in the pan for about 5 minutes. Transfer the bread to cool on a wire rack.
This will taste fine when warm, but I think it is best when it is cool. Slice it up and enjoy! And try not to eat the entire loaf by yourself in one day...
Wednesday, April 17, 2013
Apple Cider Seared Scallops
Ah, scallops. I do love them. I made some a few weeks ago and I thought, why not make them again but with a little twist?? I also really wanted to try out my Paleo "Risotto" and I do love scallops with risotto! I found this recipe via Pinterest and it looked really good, but I knew I would need to make some changes based on what ingredients I had around the house. Well, the result was fabulous! I loved the flavor and texture combinations of this meal, and it was really healthy! Here is what I did:

Apple Cider Seared Scallops
(serves 2)
If needed, defrost scallops fully (you want no moisture in them!). Blot scallops dry with a paper towel and set aside to dry as much as possible (for the best sear). Season with salt and pepper on both sides.
In a large skillet, cook pancetta//bacon over medium heat until crisp. Remove pancetta, chop/crumble into bits (when cool) and set aside. Keep the fat in there (pour some off if desired) and reheat to medium-high. If there is not very much fat, add olive oil (the mushrooms need a fair amount). Add mushrooms to pan and saute until they are soft and slightly browned. Add additional oil if needed, and toss in the spinach a handful at a time. It should start to wilt and it should all fit in the pan fine once it cooks down. Stir it around until all cooked. Season with salt and pepper and add the pancetta crumbles. Remove it all to a plate and cover with foil to keep hot (if you want to reuse the pan for the scallops- or else, just keep it in the pan and set aside).
Reheat the pan to high heat (or heat a new skillet) until really hot. Add about 1 T olive oil to the pan and once it gets hot, place the scallops down into the pan. Cook without touching them(!!) for about 3 minutes, or until the bottom of the scallop is dark brown. Turn the scallops over and sear the other side. Remove the scallops to the plate/pan with the spinach mixture and cover to keep warm. Turn back the heat to medium and pour in some apple cider vinegar and honey. It will heat up and start to bubble FAST. Stir around for about 1-2 minutes until thickened. To serve, place scallops over a bed of the spinach/mushrooms and pour some sauce over top. Yum!

Like I said, I served mine with Paleo risotto and it was a delicious meal! This is one of those restaurant-quality meals (in MY opinion), and it makes it better that it is Paleo-friendly. Enjoy!
Apple Cider Seared Scallops
(serves 2)
- 10 jumbo sea scallops
- 4 slices pancetta (or bacon, but I LOVE pancetta)
- 8-10 ounces baby spinach
- 4 ounces mushrooms (I used white button, but any would be great)
- olive oil
- salt & pepper
- about 2 T apple cider vinegar
- about 1 T raw honey
If needed, defrost scallops fully (you want no moisture in them!). Blot scallops dry with a paper towel and set aside to dry as much as possible (for the best sear). Season with salt and pepper on both sides.
In a large skillet, cook pancetta//bacon over medium heat until crisp. Remove pancetta, chop/crumble into bits (when cool) and set aside. Keep the fat in there (pour some off if desired) and reheat to medium-high. If there is not very much fat, add olive oil (the mushrooms need a fair amount). Add mushrooms to pan and saute until they are soft and slightly browned. Add additional oil if needed, and toss in the spinach a handful at a time. It should start to wilt and it should all fit in the pan fine once it cooks down. Stir it around until all cooked. Season with salt and pepper and add the pancetta crumbles. Remove it all to a plate and cover with foil to keep hot (if you want to reuse the pan for the scallops- or else, just keep it in the pan and set aside).
Reheat the pan to high heat (or heat a new skillet) until really hot. Add about 1 T olive oil to the pan and once it gets hot, place the scallops down into the pan. Cook without touching them(!!) for about 3 minutes, or until the bottom of the scallop is dark brown. Turn the scallops over and sear the other side. Remove the scallops to the plate/pan with the spinach mixture and cover to keep warm. Turn back the heat to medium and pour in some apple cider vinegar and honey. It will heat up and start to bubble FAST. Stir around for about 1-2 minutes until thickened. To serve, place scallops over a bed of the spinach/mushrooms and pour some sauce over top. Yum!
Like I said, I served mine with Paleo risotto and it was a delicious meal! This is one of those restaurant-quality meals (in MY opinion), and it makes it better that it is Paleo-friendly. Enjoy!
Paleo Cauliflower "Risotto"
I love love LOVE risotto. It is one of my favorite things ever, and it is SUPER carb-heavy. Which makes it amazing of course. So I made it my mission to find SOME way to may it Paleo-friendly! Obviously, this isn't REAL risotto, since technically "risotto" is named for the style of stirring arborio rice and chicken stock for a ridiculously long time on the stove until it becomes creamy and al dente. BUT I managed to find a way to make it taste and feel as if it was actually real risotto. Cauliflower to the rescue again! All I had to do was figure out a way to make it creamy (coconut milk of course!), and I had it made. This clearly will not be the same as the real thing (how could you replicate that joyous food?), but it is really fast and easy to make, and much healthier than the real thing. Here is what I did:

Paleo Cauliflower "Risotto"
(serves 2-3)
Heat a large skillet over medium-high. Add the olive oil and once it is hot, toss in the onion and garlic. Saute it around until the onions are translucent, about 5 minutes. Add the cauliflower and stir it around for just about 2 minutes, until it starts to cook (you don't want it to get mushy!). Pour in the chicken broth until it is absorbed, then add the coconut milk. Season with salt and pepper and stir it all around until incorporated. Allow it to bubble for a few minutes so that it thickens up, then turn the heat back down to low until you are ready to serve!
This is a great basic recipe, and something I love about risotto is that you can always add extras! Stir in veggies like peas, asparagus, or squash, or add some Parmesan cheese if you eat dairy. Or, eat it plain as a side to another meal (as we did). The sky is the limit! I hope you enjoy this Paleo version of a favorite as much as we did!
Paleo Cauliflower "Risotto"
(serves 2-3)
- 1/4 onion, chopped
- 1 clove garlic, minced
- 1 T olive oil
- 1/2 head cauliflower, grated
- 1/4 c chicken stock/broth
- 1/2 can coconut milk
- salt & pepper to taste
Heat a large skillet over medium-high. Add the olive oil and once it is hot, toss in the onion and garlic. Saute it around until the onions are translucent, about 5 minutes. Add the cauliflower and stir it around for just about 2 minutes, until it starts to cook (you don't want it to get mushy!). Pour in the chicken broth until it is absorbed, then add the coconut milk. Season with salt and pepper and stir it all around until incorporated. Allow it to bubble for a few minutes so that it thickens up, then turn the heat back down to low until you are ready to serve!
This is a great basic recipe, and something I love about risotto is that you can always add extras! Stir in veggies like peas, asparagus, or squash, or add some Parmesan cheese if you eat dairy. Or, eat it plain as a side to another meal (as we did). The sky is the limit! I hope you enjoy this Paleo version of a favorite as much as we did!
Tuesday, April 16, 2013
Oven Roasted Cabbage
I made this side dish the other night, and I have been meaning to share it with the world! I found this idea on Pinterest and I made a few adjustments to make it Paleo, and it came out great. It was certainly easy and delicious and if you know anything about cabbage, you know it is super healthy too! Here is what I did:
 Oven Roasted Cabbage
(serves 4)
Preheat oven to 425 degrees. Place each quarter of the cabbage on its own piece of foil. Drizzle olive oil, lemon juice and vinegar on top of each chunk. Sprinkle each with bacon bits and salt & pepper. Fold up the foil to make individual pouches for each quarter, and place them all on a baking sheet/pan. Bake for 20-30 minutes. Then, unwrap the foil and you are ready to serve! Enjoy!

Oven Roasted Cabbage(serves 4)
- cabbage, quartered
- olive oil
- lemon juice
- red wine vinegar
- bacon bits (about 2 slices, cooked & chopped)
- salt & pepper
Preheat oven to 425 degrees. Place each quarter of the cabbage on its own piece of foil. Drizzle olive oil, lemon juice and vinegar on top of each chunk. Sprinkle each with bacon bits and salt & pepper. Fold up the foil to make individual pouches for each quarter, and place them all on a baking sheet/pan. Bake for 20-30 minutes. Then, unwrap the foil and you are ready to serve! Enjoy!
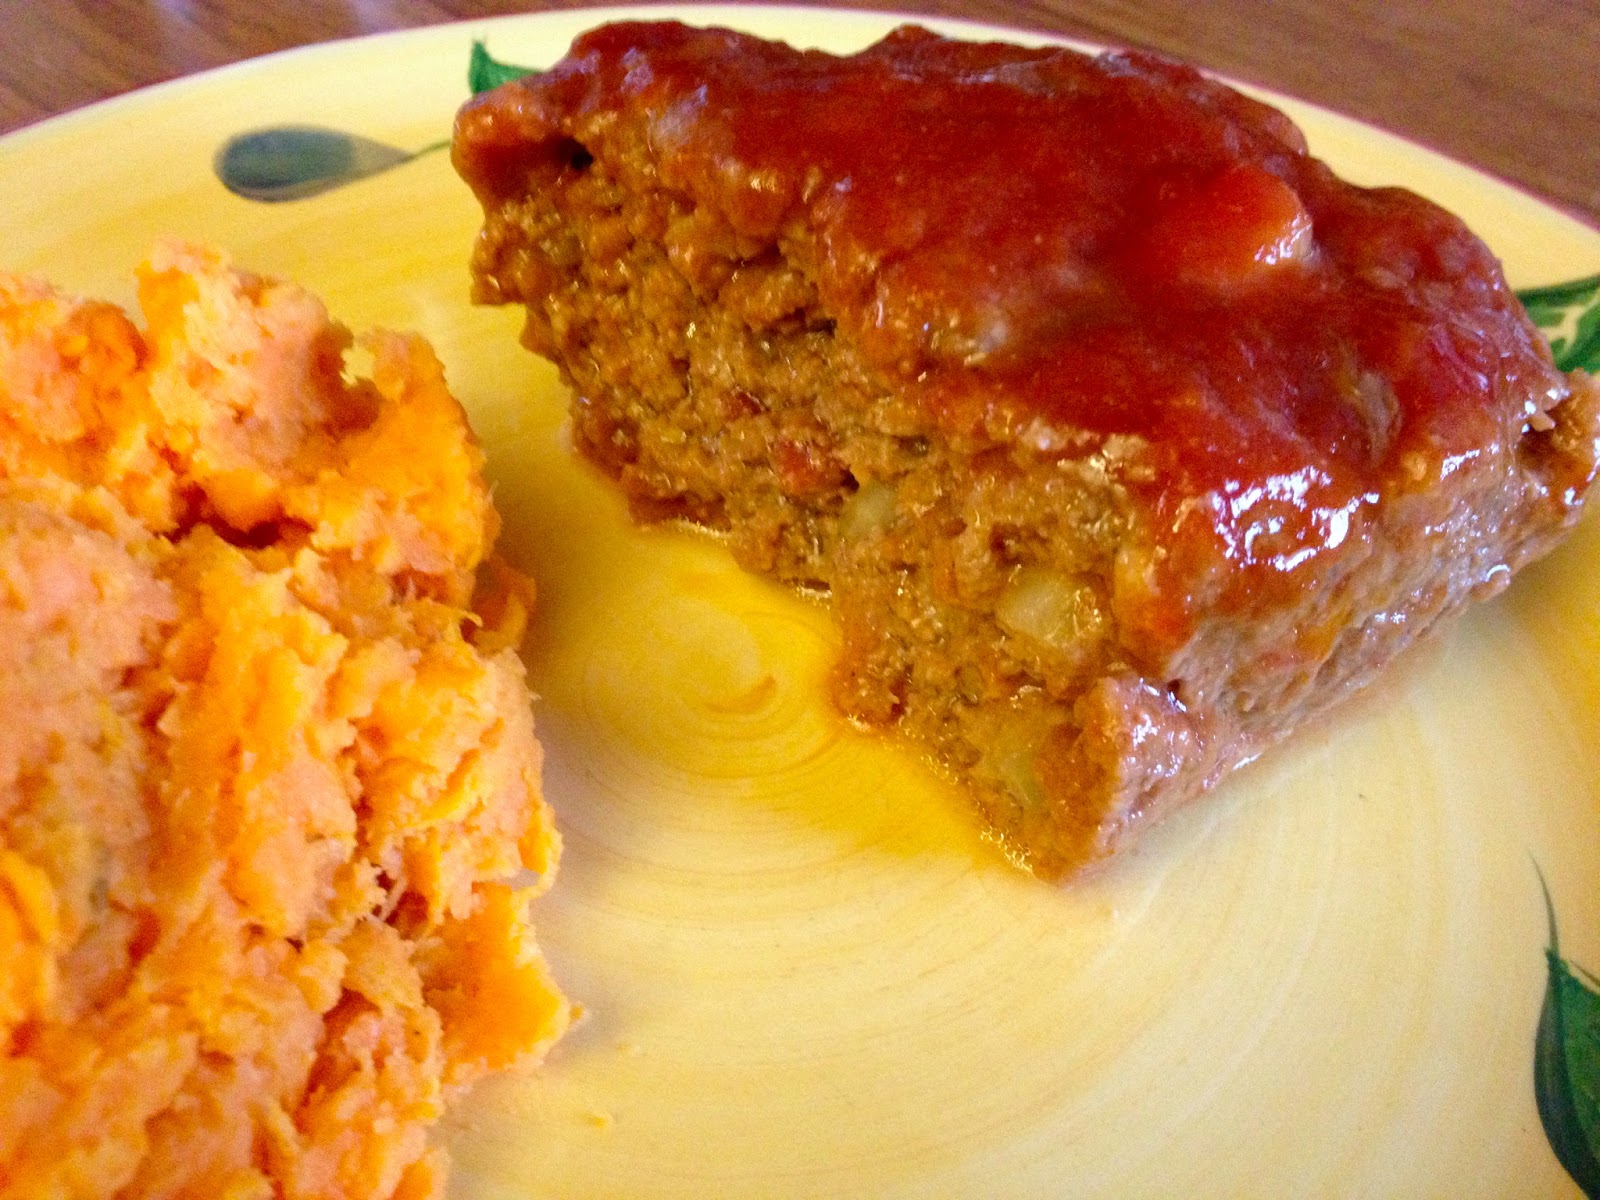
Paleo Meatloaf (Extra Meaty!)
Tonight we really needed some comfort food. Again. We are in the middle of yet another April snowstorm, it is really cold and miserable outside, and there is a lot of bad stuff going on across the country today. So, meatloaf it is! I actually really like meatloaf, even though sometimes it gets a bad rap. I have made a version from my favorite blogger the Pioneer Woman before that is really good and involves bacon, which of course is ideal. So I wanted to incorporate bacon into my meatloaf, but a different way. It is optional, but gives it a little more flavor and meatiness. Now, the one issue with most meatloaf recipes is that they use bread/breadcrumbs and milk, so I had to make some substitutions of course. All-in-all, this tasted delicious and was a Paleo success! Here is what I did:
Paleo Meatloaf (Extra Meaty!)
 (serves 2-3)
Preheat oven to 350 degrees. Add almond milk and almond flour to a mixing bowl and allow them to soak together for a few minutes. Add ground beef, onion, egg, salt, seasoned salt, pepper, and bacon bits and mix it all together. I like to just dig right in with my hands! Once it is all nice and combined, grab a loaf pan and mold the mixture in to the pan. OR just line a baking sheet/pan with foil and make a loaf shape out of the mixture right on there. It will look like this:

Then, coat the top with about 1/3 c ketchup, or at least enough to cover it. Bake for about 30 minutes, then remove from the oven, pour on another 1/3 c of ketchup to cover it again, and put it back in the oven for 15 more minutes. It will look like this:

Once it is all done baking, pour the remaining 1/3 c of ketchup over top and you are ready to serve! I sliced mine into chunks and served it with my Mashed Sweet Potatoes. It tasted delicious! I highly recommend you try this recipe if you are looking for some wonderful and Paleo-friendly comfort food. Enjoy!
Paleo Meatloaf (Extra Meaty!)
(serves 2-3)- 1/2 c almond flour
- 1/4 c almond milk
- 1 lb ground beef
- 1/4 onion, minced
- 1 egg
- 3/4 t salt
- 1/4 seasoned salt
- 1/4 t black pepper
- 2 T (2 cooked slices) bacon, chopped (optional, but recommended!)
- 1 c Paleo ketchup
Preheat oven to 350 degrees. Add almond milk and almond flour to a mixing bowl and allow them to soak together for a few minutes. Add ground beef, onion, egg, salt, seasoned salt, pepper, and bacon bits and mix it all together. I like to just dig right in with my hands! Once it is all nice and combined, grab a loaf pan and mold the mixture in to the pan. OR just line a baking sheet/pan with foil and make a loaf shape out of the mixture right on there. It will look like this:
Then, coat the top with about 1/3 c ketchup, or at least enough to cover it. Bake for about 30 minutes, then remove from the oven, pour on another 1/3 c of ketchup to cover it again, and put it back in the oven for 15 more minutes. It will look like this:
Once it is all done baking, pour the remaining 1/3 c of ketchup over top and you are ready to serve! I sliced mine into chunks and served it with my Mashed Sweet Potatoes. It tasted delicious! I highly recommend you try this recipe if you are looking for some wonderful and Paleo-friendly comfort food. Enjoy!
Paleo Ketchup
I can't believe I haven't made my own Paleo ketchup until now. What have I been doing??? I guess we have been using other condiments and sauces instead. Well, I finally did it, and it was so easy! I found some basic recipes online and I knew ketchup was essentially tomato, vinegar, and some spices. So creating my own was fairly simple. I used this for meatloaf last night, but we still have some in the fridge to use on other things as well! Here is what I did:
Paleo Ketchup
(makes about 2 cups)
Combine all ingredients in a small sauce pan over medium heat. Heat to a boil, then reduce the heat to low and simmer for about 15-20 minutes. Refrigerate for a few weeks and use as needed!

Paleo Ketchup
(makes about 2 cups)
- 1 (15 oz) can tomato sauce
- 1/3 c raw honey
- 4 T apple cider vinegar
- 1/2 t dry mustard
- 1/2 t garlic powder
- 1/2 t onion powder
- 1 t salt
Combine all ingredients in a small sauce pan over medium heat. Heat to a boil, then reduce the heat to low and simmer for about 15-20 minutes. Refrigerate for a few weeks and use as needed!
Sunday, April 14, 2013
Paleo Breadsticks
I really love breadsticks and my husband especially loves garlic bread, so we have been on a quest for awhile now to find some kind of Paleo version that is actually good. Well, I came across this recipe on Pinterest, and I think I may have actually found a winner! These breadsticks were flavorful and actually tasted like real, non-Paleo ones. They took a little time to make, and rolling out the dough can be a little tedious, but in the end it was worth it! Here is what I did:
 Paleo Breadsticks
(makes 4)
Preheat oven to 350 degrees. Line a baking sheet with parchment paper and set aside. In a large bowl combine almond flour, 1 1/2 t pizza seasoning, 1/4 t garlic powder, 1/2 teaspoon sea salt, and olive oil. In a small bowl, whisk 2 eggs together. Add egg mixture to the almond flour mix and stir until combined. It will become wet and dough-like. Add 1 T coconut flour and stir to combine. Allow the mixture to sit for a minute (it will thicken and get drier) and then add the rest of coconut flour and stir to combine. The batter should be slightly sticky and able to roll into a ball.
Make a ball of dough (about 1/4 the dough) and on a large clean surface (I used a baking mat) roll dough using finger tips to make a long rope about 1/2 inch thick in diameter. Carefully fold the long rope in half so you have two pieces in equal size. Carefully pinch the two tops together and start twisting the two pieces of dough together to make a twist. If the dough starts to crack, do your best to smooth out the cracks. Repeat this with the rest of the dough (should have 4 total). Place the breadsticks onto prepared baking sheet and place in preheated oven. Bake for 10 minutes. Mine looked like this:

In a small bowl whisk 1 egg with 1 teaspoon water. In another small bowl add 1/2 t pizza seasoning, 1/4 t garlic powder, and 1/2 t sea salt and mix to combine. Remove the sticks from the oven and carefully turn them over. The bottoms should be golden. Then brush the tops of the sticks (which were the bottoms) with the egg wash and then sprinkle with the seasoning mix. Mine looked like this:

Increase the heat of oven to 375 degrees. Place the pizza sticks back in the oven and bake for an additional 5 minutes. Remove and allow the sticks to cool slightly before serving. They will be golden and delicious when they are done:

I served these the other day with my Paleo "Baked Potato" Cauliflower Soup and they were a great addition to that meal. You could also serve them with Homemade Pizza Sauce and make it a fun appetizer or side. Regardless, you have to try these Paleo breadsticks- they will make your day!!!
Paleo Breadsticks(makes 4)
- 1 1/2 c almond flour
- 2 t pizza seasoning, divided
- 1/2 t garlic powder, divided
- 1 t sea salt, divided
- 1 T olive oil
- 3 eggs, divided
- 2 T coconut flour
Preheat oven to 350 degrees. Line a baking sheet with parchment paper and set aside. In a large bowl combine almond flour, 1 1/2 t pizza seasoning, 1/4 t garlic powder, 1/2 teaspoon sea salt, and olive oil. In a small bowl, whisk 2 eggs together. Add egg mixture to the almond flour mix and stir until combined. It will become wet and dough-like. Add 1 T coconut flour and stir to combine. Allow the mixture to sit for a minute (it will thicken and get drier) and then add the rest of coconut flour and stir to combine. The batter should be slightly sticky and able to roll into a ball.
Make a ball of dough (about 1/4 the dough) and on a large clean surface (I used a baking mat) roll dough using finger tips to make a long rope about 1/2 inch thick in diameter. Carefully fold the long rope in half so you have two pieces in equal size. Carefully pinch the two tops together and start twisting the two pieces of dough together to make a twist. If the dough starts to crack, do your best to smooth out the cracks. Repeat this with the rest of the dough (should have 4 total). Place the breadsticks onto prepared baking sheet and place in preheated oven. Bake for 10 minutes. Mine looked like this:
In a small bowl whisk 1 egg with 1 teaspoon water. In another small bowl add 1/2 t pizza seasoning, 1/4 t garlic powder, and 1/2 t sea salt and mix to combine. Remove the sticks from the oven and carefully turn them over. The bottoms should be golden. Then brush the tops of the sticks (which were the bottoms) with the egg wash and then sprinkle with the seasoning mix. Mine looked like this:
Increase the heat of oven to 375 degrees. Place the pizza sticks back in the oven and bake for an additional 5 minutes. Remove and allow the sticks to cool slightly before serving. They will be golden and delicious when they are done:
I served these the other day with my Paleo "Baked Potato" Cauliflower Soup and they were a great addition to that meal. You could also serve them with Homemade Pizza Sauce and make it a fun appetizer or side. Regardless, you have to try these Paleo breadsticks- they will make your day!!!
Wednesday, April 10, 2013
Paleo "Baked Potato" Cauliflower Soup
So, we are in the middle of a really awful snow storm. In April. I know for a lot of people around here, this is normal, but for us it is definitely not. It's the worst. So since it apparently is winter again, I decided I may as well make a wintertime meal- soup! I have made "baked potato" soup with cauliflower before and I really enjoyed it, so I wanted to make it again but totally Paleo. Well, as Paleo as it was going to get. See here is the thing, this soup really tastes best with cheese. Delicious cheddar cheese. Well, I was going to completely eliminate the cheese, but when I tasted it at the last minute I was like, this really could use some cheese. So I may have added a bit... The original recipe calls for about 2 cups of cheese, which is amazing of course, but I only added about 1/4 cup just to be "good." Plus, we did agree that we would allow some dairy back into our lives now that our 40 days is over. So, the moral of the story is this: If you are hardcore Paleo, don't add any cheese. It will still taste pretty good. If you are eating some dairy, add a little cheese. If you have no limit to dairy in your life, add a lot of cheese. The choice is yours! Regardless, this soup is good stuff and really does taste a lot like baked potato soup, but a LOT healthier. Here is what I did:
Paleo "Baked Potato" Cauliflower Soup
(serves 2-4)
Saute bacon in a large soup pot over medium heat until crisp. Using a slotted spoon, transfer bacon to a paper towel-lined plate then remove all but 1 T of grease from the pot. (Or if you prefer, remove the grease and add olive oil instead). Add chopped onion, celery, and garlic to the pot then season with salt and pepper and saute until vegetables are tender and the onion is translucent, about 4-5 minutes. Add cauliflower to the pot and stir to combine. Add water, then put a lid on the pot and steam the mixture for about 5 minutes, stirring occasionally, until the cauliflower is tender. Add chicken broth and almond milk and bring to a boil. Once it has boiled for a few minutes, turn the heat down to low and simmer as long as you want. When you are ready to serve, add the cheese (if you are using it) and half the bacon and stir. HINT: If you aren't using cheese, you may need to add some more salt & pepper for seasoning, so it would be smart to taste it at this point. Serve topped with more bacon and cheese, if desired.
 Doesn't that just look delish?! It really is great and perfect for a snowy (April) day. And like I said, the more cheese the better, but try to stay Paleo of course ;)

Sometimes you just have to splurge a little on the cheese! Hope you enjoy your Paleo low-carb version of Baked Potato Soup, cheesey or cheeseless!
Paleo "Baked Potato" Cauliflower Soup
(serves 2-4)
- 8 slices bacon, chopped (half used for garnish)
- 1/2 small onion, chopped
- 1 celery stalk, chopped
- 2 garlic cloves, minced
- salt & pepper
- 1/2 head cauliflower, grated or food-processed
- 2 T water
- 2 c chicken broth
- 1 c almond milk
- 1/4 to 2 c cheddar cheese, grated (OPTIONAL or use any amount you want)
Saute bacon in a large soup pot over medium heat until crisp. Using a slotted spoon, transfer bacon to a paper towel-lined plate then remove all but 1 T of grease from the pot. (Or if you prefer, remove the grease and add olive oil instead). Add chopped onion, celery, and garlic to the pot then season with salt and pepper and saute until vegetables are tender and the onion is translucent, about 4-5 minutes. Add cauliflower to the pot and stir to combine. Add water, then put a lid on the pot and steam the mixture for about 5 minutes, stirring occasionally, until the cauliflower is tender. Add chicken broth and almond milk and bring to a boil. Once it has boiled for a few minutes, turn the heat down to low and simmer as long as you want. When you are ready to serve, add the cheese (if you are using it) and half the bacon and stir. HINT: If you aren't using cheese, you may need to add some more salt & pepper for seasoning, so it would be smart to taste it at this point. Serve topped with more bacon and cheese, if desired.
Sometimes you just have to splurge a little on the cheese! Hope you enjoy your Paleo low-carb version of Baked Potato Soup, cheesey or cheeseless!
Tuesday, April 9, 2013
Almond-Crusted Tilapia
Tonight for dinner I needed to make something indoors, since our April blizzard was beginning... So I went with tilapia, which I made a few weeks back, but I did something a little different this time. I really enjoy using panko to "bread" tilapia, so I thought I may as well try using almond flour instead of panko to make a similar crust. I have used this recipe before, and I really like the spices and the coating, so I decided to make it tonight. Subbing almond meal for the panko was good- it is not going to be as light/airy as panko of course, but it was still a nice texture and the fish tasted great. Here is what I did:
Almond-Crusted Tilapia
(serves 2-3)

Preheat oven to 375 degrees. In a shallow dish, combine 1 T olive oil, garlic powder, and lemon juice. In another shallow dish/plate, combine almond flour and the rest of the dry ingredients. Mix it up until well combined. Heat 2 T olive oil in a large skillet over medium-high heat. Coat each fillet with the oil/lemon mixture, then with the flour mixture. Try to get them as coated as possible! Once oil is hot, add the flour- coated fillets. Cook for about 2-3 minutes per side, or until they are brown on each side. Be very careful when flipping them over, as the fish can flake easily. Once they are brown on both sides, either transfer them to a baking dish to place in the oven, or move the skillet to the oven. Bake for about 10 minutes, or until they flake with a fork. Be sure not to overcook! Serve immediately.
I served this with butternut squash (that I have made before) and a salad. It was a tasty meal and very healthy too! If you like panko, it won't be the same, but it will definitely taste almost as great :) Enjoy!
Almond-Crusted Tilapia
(serves 2-3)
- 2-3 tilapia fillets, rinsed and patted dry
- 1 T olive oil
- 1/4 t garlic powder
- 1-2 T freshly squeezed lemon juice
- 1 c almond meal/flour
- 1 1/2 t dry mustard
- 1 1/2 t black pepper
- 3/4 t nutmeg
- 1/2 t ginger
- 1/2 t paprika
- 1/2 crushed red pepper flakes
- 2 T olive oil (additional)
Preheat oven to 375 degrees. In a shallow dish, combine 1 T olive oil, garlic powder, and lemon juice. In another shallow dish/plate, combine almond flour and the rest of the dry ingredients. Mix it up until well combined. Heat 2 T olive oil in a large skillet over medium-high heat. Coat each fillet with the oil/lemon mixture, then with the flour mixture. Try to get them as coated as possible! Once oil is hot, add the flour- coated fillets. Cook for about 2-3 minutes per side, or until they are brown on each side. Be very careful when flipping them over, as the fish can flake easily. Once they are brown on both sides, either transfer them to a baking dish to place in the oven, or move the skillet to the oven. Bake for about 10 minutes, or until they flake with a fork. Be sure not to overcook! Serve immediately.
I served this with butternut squash (that I have made before) and a salad. It was a tasty meal and very healthy too! If you like panko, it won't be the same, but it will definitely taste almost as great :) Enjoy!
Sunday, April 7, 2013
Summertime "Spaghetti" with Grilled Chicken & Tomatoes
Well, even though the temperature outside has been in the 50's and 60's for the past week or so, we are now under a blizzard watch for the next few days. Awesome. Have I ever mentioned that I hate snow? Especially in APRIL. Yeah, well, I do. So I decided to pretend this is not actually going to happen and make a summertime meal for dinner tonight! In my mind at least, it is a lovely spring-summer day. I saw this recipe on Pinterest a few days ago and it sounded good- I just had to tweak it to make it Paleo! Here is what I did:
Summertime "Spaghetti" with Grilled Chicken & Tomatoes
(serves about 3)
In a bowl or Ziploc bag, combine 2 T olive oil, lemon juice, lemon zest, thyme, rosemary, salt, and pepper. Mix it around and add the chicken breasts. Allow to marinade for at least 20 minutes, or for a few hours for more flavor. To cook the chicken, heat your grill to medium/medium-high and cook for about 6-7 minutes on each side. Alternatively, you could bake at 350 or saute the chicken in olive oil on the stove. But I think the grilled flavor is the BEST. Once it is cooked, slice the chicken into thin slices. Here it is right off the grill. So. Delicious.

For the rest of the meal, heat a large skillet over medium heat and add the olive oil. Add the garlic and saute until fragrant, about 3 minutes. Add chicken stock and simmer for a few minutes, then add the chopped basil. Season with salt and pepper to taste. Add the tomatoes, whole, and the spinach and cook until they begin to soften. Add the spaghetti squash and stir until incorporated. Add the sliced chicken and toss it all together. When it is ready, the tomatoes should be soft so that if you poke one, it easily bursts (some may already have burst). To serve, scoop it all onto the plate, and top with parsley and parmesan cheese, if desired. Enjoy!

Oh and head's up- this chicken marinade on it's own is seriously delicious. I let it marinade about 1-2 hours, and the chicken was AMAZING. Lemony-herbs and goodness. I highly recommend it for any grilled chicken meal. All in all, this was a great meal and almost made me feel like it really was summer!
Summertime "Spaghetti" with Grilled Chicken & Tomatoes
(serves about 3)
- 2 boneless skinless chicken breasts
- 2 T olive oil
- juice of 1/2 lemon
- zest of 1/2 lemon
- 2 t fresh thyme, chopped
- 2 t fresh rosemary, chopped
- 1 t kosher/sea salt
- 1/2 t fresh ground black pepper
- 1/2 spaghetti squash (I used the leftover 1/2 from an earlier meal- check out this post for instructions)
- 1 T olive oil (additional)
- 3 cloves garlic, minced
- 2 c chicken broth
- 1 T fresh basil, chopped
- salt & pepper (additional)
- 1 c yellow mini tomatoes
- 1 c red grape tomatoes
- 1-2 c baby spinach
- OPTIONAL: fresh parsley & parmesan cheese as toppings
In a bowl or Ziploc bag, combine 2 T olive oil, lemon juice, lemon zest, thyme, rosemary, salt, and pepper. Mix it around and add the chicken breasts. Allow to marinade for at least 20 minutes, or for a few hours for more flavor. To cook the chicken, heat your grill to medium/medium-high and cook for about 6-7 minutes on each side. Alternatively, you could bake at 350 or saute the chicken in olive oil on the stove. But I think the grilled flavor is the BEST. Once it is cooked, slice the chicken into thin slices. Here it is right off the grill. So. Delicious.
For the rest of the meal, heat a large skillet over medium heat and add the olive oil. Add the garlic and saute until fragrant, about 3 minutes. Add chicken stock and simmer for a few minutes, then add the chopped basil. Season with salt and pepper to taste. Add the tomatoes, whole, and the spinach and cook until they begin to soften. Add the spaghetti squash and stir until incorporated. Add the sliced chicken and toss it all together. When it is ready, the tomatoes should be soft so that if you poke one, it easily bursts (some may already have burst). To serve, scoop it all onto the plate, and top with parsley and parmesan cheese, if desired. Enjoy!
Oh and head's up- this chicken marinade on it's own is seriously delicious. I let it marinade about 1-2 hours, and the chicken was AMAZING. Lemony-herbs and goodness. I highly recommend it for any grilled chicken meal. All in all, this was a great meal and almost made me feel like it really was summer!
Caramelized Honey Bananas
So, I won't lie, I did not come up with the idea for caramelized bananas myself... I found this recipe via Pinterest and decided to try it out! I have been trying to get back into the Paleo life after this last week of kind of halfway doing it, so I wanted to start off the week right with a great breakfast! I made my Apple Cinnamon Almond Butter Pancakes this morning, and I wanted to top them with a sweet and health treat. So I tried this out, and it was delicious! It was really simple and was a great topping for the pancakes! Check it out...
 Caramelized Honey Bananas
(serves 2)
Slice your banana into about 1/2 in slices. Heat a large skillet over medium-high, and add the coconut oil. Once it is hot, add the banana slices into the pan and allow them to fry in the pan for about 2 minutes. DO NOT MOVE THEM AROUND. You want them to get nice and caramelized. Once they are brown on the bottom, flip them over. At this point, turn off the heat. Mix the honey and water together and pour it over top of the bananas- it will get really bubbly! Sprinkle the cinnamon over top of the bananas and they are ready to serve! It should look like this:

Like I said, I served these on top of pancakes, but they would also be great as a topping for ice cream, shortcake, or really any other dessert or breakfast. Enjoy!
Caramelized Honey Bananas(serves 2)
- 1 t coconut oil
- 1 large banana
- 1/2 t cinnamon
- 1 T raw honey
- 1/2 T water
Slice your banana into about 1/2 in slices. Heat a large skillet over medium-high, and add the coconut oil. Once it is hot, add the banana slices into the pan and allow them to fry in the pan for about 2 minutes. DO NOT MOVE THEM AROUND. You want them to get nice and caramelized. Once they are brown on the bottom, flip them over. At this point, turn off the heat. Mix the honey and water together and pour it over top of the bananas- it will get really bubbly! Sprinkle the cinnamon over top of the bananas and they are ready to serve! It should look like this:
Like I said, I served these on top of pancakes, but they would also be great as a topping for ice cream, shortcake, or really any other dessert or breakfast. Enjoy!
Saturday, April 6, 2013
Our First Week Post-Challenge
You may have noticed that I haven't blogged at all in the last week, and that is mostly due to the fact that this has been a crazy last few days. Sunday of course was Easter aka Binge Day, then Tuesday was my birthday, Wednesday I had a big job interview, Thursday I found out I got the job I wanted, and Friday was a celebration day. So needless to say, we were not very Paleo this week. We had kind of planned to lay off of Paleo a bit this week, and that definitely happened. Here's a recap of how we did:
Sunday: As you know, this was Easter. The first day in weeks that we could indulge in any foods we wanted! I woke up early before church (and before work for my husband) and made some french toast- that's right- bread! It was amazing. Later, I went to a huge Easter brunch buffet with some friends, and I definitely indulged myself. An omelet, ham, ROLLS, caprese salad, shrimp, pasta salad, and TONS of desserts. It was kind of gross. But amazing. Meanwhile, out in the field at work, my husband got exactly what he had wanted: a cheeseburger and fries. He reported that it was wonderful. Even though I was NOT hungry, I ended up indulging even further later on that day with the meal I had been dreaming about for weeks- Chicken Parmesan- EXTRA cheesey. It. Was. Incredible. And I may or may not have washed it down with 2/3 box of Samoas that I had frozen during Girl Scout cookie season... I feel kind of disgusting admitting all this, but it was my binge day! So it was acceptable... Check out my first non-Paleo dinner and look at that CHEESE:

Monday: We tried to get back into Paleo, at least somewhat. We both kept with Paleo meals for breakfast, lunch, and snacks, and decided again to splurge a little bit for dinner. I made burgers (again for the hubby), but we did use buns and cheese. So it wasn't a TOTAL Paleo day, but we were able to stay pretty good. Oh, except for the Samoas we ate for dessert ;)
Tuesday: It was my birthday! So of course it was a free day! I may have indulged in some non-Paleo items throughout the day, and we went out to a nice restaurant for dinner where I ordered whatever I wanted! It was wonderful. We also went out to a local brewery for some beers, so we definitely were consuming non-Paleo items. You only have one birthday a year, so you have to live it up of course!
Wednesday & Thursday: We decided to go back to being strictly Paleo these days. We had our usual breakfasts and lunches, and I made some simple Paleo dinners. We had ground turkey tacos wrapped in cabbage leaves one night, and ham & asparagus the other night. (I won't lie- I did sprinkle some cheese on my taco- but it was "minimal" dairy!) We were back to our old ways and it was great!
Friday & Saturday: We had talked about doing the 75/25 Paleo plan from now on, and we decided to do take our "off" days on the weekends. That means, from now on, we will stay Paleo Sunday-Thursday and then eat whatever we want on Friday and Saturday. So we thought we may as well start that this week. Friday, we got something we haven't had in a LONG time and really wanted: PIZZA! We ordered pizza, and it was greasy and incredible. We also had lots of leftover pizza to finish off on Saturday. We also went out to a bar on Friday night and probably drank more alcohol than we should have, but we were celebrating some big events this week!
So, this week has been interesting for sure. It was nice to get to eat our favorite foods again, but I actually kind of missed being Paleo in some ways. My body feels more tired and my intestines aren't as happy as they were before, so it is clear that Paleo was the healthier way to go. Starting Sunday, we will be officially starting our Paleo 5 days a week and non-Paleo 2 days a week plan, so hopefully things will get back to normal again. And I promise I will get back to making fun, creative Paleo meals to share with you all!
Sunday: As you know, this was Easter. The first day in weeks that we could indulge in any foods we wanted! I woke up early before church (and before work for my husband) and made some french toast- that's right- bread! It was amazing. Later, I went to a huge Easter brunch buffet with some friends, and I definitely indulged myself. An omelet, ham, ROLLS, caprese salad, shrimp, pasta salad, and TONS of desserts. It was kind of gross. But amazing. Meanwhile, out in the field at work, my husband got exactly what he had wanted: a cheeseburger and fries. He reported that it was wonderful. Even though I was NOT hungry, I ended up indulging even further later on that day with the meal I had been dreaming about for weeks- Chicken Parmesan- EXTRA cheesey. It. Was. Incredible. And I may or may not have washed it down with 2/3 box of Samoas that I had frozen during Girl Scout cookie season... I feel kind of disgusting admitting all this, but it was my binge day! So it was acceptable... Check out my first non-Paleo dinner and look at that CHEESE:
Monday: We tried to get back into Paleo, at least somewhat. We both kept with Paleo meals for breakfast, lunch, and snacks, and decided again to splurge a little bit for dinner. I made burgers (again for the hubby), but we did use buns and cheese. So it wasn't a TOTAL Paleo day, but we were able to stay pretty good. Oh, except for the Samoas we ate for dessert ;)
Tuesday: It was my birthday! So of course it was a free day! I may have indulged in some non-Paleo items throughout the day, and we went out to a nice restaurant for dinner where I ordered whatever I wanted! It was wonderful. We also went out to a local brewery for some beers, so we definitely were consuming non-Paleo items. You only have one birthday a year, so you have to live it up of course!
Wednesday & Thursday: We decided to go back to being strictly Paleo these days. We had our usual breakfasts and lunches, and I made some simple Paleo dinners. We had ground turkey tacos wrapped in cabbage leaves one night, and ham & asparagus the other night. (I won't lie- I did sprinkle some cheese on my taco- but it was "minimal" dairy!) We were back to our old ways and it was great!
Friday & Saturday: We had talked about doing the 75/25 Paleo plan from now on, and we decided to do take our "off" days on the weekends. That means, from now on, we will stay Paleo Sunday-Thursday and then eat whatever we want on Friday and Saturday. So we thought we may as well start that this week. Friday, we got something we haven't had in a LONG time and really wanted: PIZZA! We ordered pizza, and it was greasy and incredible. We also had lots of leftover pizza to finish off on Saturday. We also went out to a bar on Friday night and probably drank more alcohol than we should have, but we were celebrating some big events this week!
So, this week has been interesting for sure. It was nice to get to eat our favorite foods again, but I actually kind of missed being Paleo in some ways. My body feels more tired and my intestines aren't as happy as they were before, so it is clear that Paleo was the healthier way to go. Starting Sunday, we will be officially starting our Paleo 5 days a week and non-Paleo 2 days a week plan, so hopefully things will get back to normal again. And I promise I will get back to making fun, creative Paleo meals to share with you all!
Subscribe to:
Posts (Atom)